Showing posts with label Content. Show all posts

Sunday, July 14, 2013

What happened to My Links? How can I enable them?

If you've used My Links in SharePoint 2007, once you've upgraded to SharePoint 2010 you'll notice that there is no My Links option in the My Sites of the SharePoint 2010. With the introduction of Tags and Notes feature of the SharePoint 2010 Microsoft hid the My Links feature so they would like to push Tags and Notes more and they don't want people to use My Links. I can't blame them because once you start using the tags and notes feature you will see hat it way more powerful mechanism to manage and store the links and other bookmarks. I will create another blog post about how to tag external links in the SharePoint.

Let's get back to subject of this blog post. Your "My Links" went a bit of under the hood however nothing has been lost. Even if you've migrated from SharePoint 2007 your links are still there but you have to dig a bit to reveal them.

We will reveal them together in this blog. First if we look at Out of the Box My Sites or our famous top right menu there is no "My Links":
 
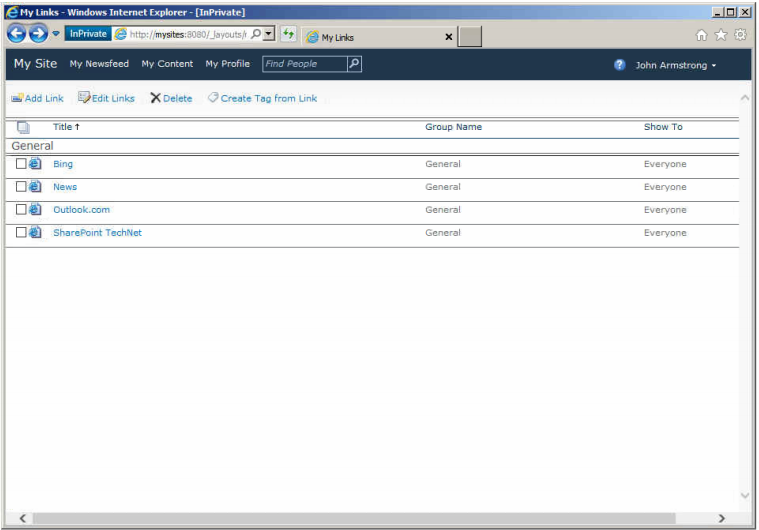
 Microsoft hid our links at /_layouts/myquicklinks.aspx page. If we navigate to http://mysites:8080/_layouts/myquicklinks.aspx page we will be able to see our links carried over from the SharePoint 2007 migration:


Now we would like to add this to somewhere easy to navigate. The easiest place to add to my links as menu item is to add them My Sites top navigation menu. In order to do that we need to browse to SharePoint Central Administration > Application Management > Manage Service Applications > User Profile Service Application and select Configure Personalization Site option in the My Site Settings group:

We will click to the New Link option on the menu to add an item to My Site top navigation bar:


We will fill the following information in the New Link form and click Ok once we are done.
URL:  http://mysites:8080/_layouts/myquicklinks.aspx
Description: My Links
Owner: [Add your Site Collection Admin]
Target Audiences: All site users


Voila!!! here is our mysteriously hidden My Links page revealed:


I hope this helps...

Tuesday, October 16, 2012

People Search in SharePoint 2010

People Search Box Web Part in SharePoint 2010


People Search is one of the great and useful features of SharePoint 2010. By using people search feature of the SharePoint 2010 users can find their co-workers not just by their names, by their hobbies, interests, department, job title, knowledge and expertise as well.

In this blogbost I would like to show you how you can enable the SharePoint People Search web part and customize it. So let's get started.

If you have a brand new SharePoint 2010 farm or you have not configure the search in your SharePoint 2010 platform, this is something you need to take care first. Here is how:
  • You need to visit the SharePoint central admin and locate your content sources under the search service application by clicking "Application Management", "Manage Service Applications", "Search Service Application" and "Content Sources".
  • If this is a new instance you'll probable have one item called "Local SharePoint sites". Please click this content source and edit.
  • In this page you need to make sure sps3://MySiteRoot item is in your start addresses list. 
  • You alse need to scheudle the full and incremental crawl in this page and check "Start full crawl of this content source" before clicking "Ok.
  • At this time you'll see the following screen:
Once this is completed, now you can insert SharePoint 2010 People Search Box web part into any page you desire. In my example I am placing the web part right into the SharePoint home page. 
  • First you will edit the page by going "Site Actions", "Edit Page"


  • Then you can select "Insert", "Web Part" by going "Editing Tools" ribbon.
  • You will chose "People Search Box" web part under the "Search" category of web parts. 


  • Once the People Search Box web part is added tot he page then we can configure the web part selecting "Edit Web Part" from the web part drop down menu.
  • While you are editing the web part, you can have scopes drop down menu and select which search scope you'd like to use and in which format. In this blog post since I will be showing the People Search, I am not including the "Scopes" drop down menu.
  • You can configure the Query Text Box, by assigning a label, fixing it's size, and defining the text box prompt string.


  • Query suggestions is a great way to display keyword suggestions to end-user while they are typing the query. These suggestion will be created automatically by SharePoint automatically based on certain number of click-throughs. There is a daily timer job scheduled to compile the suggestions. It is called "Prepare query suggestions" timer job and it is turned on by default.  If you are testing the keyword suggestions, you probably don't have any suggestion compiled yet. You can add these suggestions manually with power shell scripts. here is an example:

$searchapp = Get-SPEnterpriseSearchServiceApplication -Identity "Search Service Application"
New-SPEnterpriseSearchLanguageResourcePhrase -SearchApplication $searchapp -Language En-Us -Type QuerySuggestionAlwaysSuggest -Name "Jeff Armstrong"
New-SPEnterpriseSearchLanguageResourcePhrase -SearchApplication $searchapp -Language En-Us -Type QuerySuggestionAlwaysSuggest -Name "John Smith"
New-SPEnterpriseSearchLanguageResourcePhrase -SearchApplication $searchapp -Language En-Us -Type QuerySuggestionAlwaysSuggest -Name "Jennifer McDonald"
Start-SPTimerJob -Identity "prepare query suggestions"


  • There are many options to configure in miscellaneous section of the SharePoint People Search Box web part. Please refer to this TechNet article for further configuration options: Change properties for the Search Box Web Part (SharePoint Server 2010)
  • Once it is configured you can save the web part and save and check-in the page you are editing. This is how it will look like on the page: 


If you have done everything correctly and you have SharePoint publishing features enabled you will get a "404-Page not found" error because "peopleresults.aspx" does not exist in the Site Pages library. There are a few ways to workaround this issue. One of them is to create people results page manually. which is detailed in my other blog post called "People Search Results Return 404 - peopleresults.aspx is missing."
Here is how your results page will look like:


People Search Results Return 404 - peopleresults.aspx is missing.

People Search Results Return 404 - peopleresults.aspx is missing.


If you've turned on SharePoint publishing features and used a publishing page to house your people search web part, you got an HTTP 404 Page Not Found error.

If you can delete the "Basic Search Center" and create a new "Enterprise Search Center" you can resolve the issue. However if it is not your intention to create an Enterprise Search Center you can create th epeoplesearch.aspx page manually. Here is how:


  • Please create a new page by going "Site Actions", and "New Page"


  • You need to call this page "peopleresults"
  • This action will create a new page called "peopleresults.aspx" in the site pages liblary.
  • I suggest that you should create a basic two column 1 row table here. First column will host the search filter web part and second one will show the people search results. 
  • Please select Insert -> Table -> 2x1 Table.
  • Set the first column width to 150 pixels


  • Please locate you cursor in the first column and add "People Refinement Panel" web part by going "Editing Tools" -> "Insert" -> "Web Part" -> "People Refinement Panel".

  • Now you can locate you cursor in the second column do the same thing for "People Search Core Results" web part by going "Insert -> Web Part" under "Editing Tools"

  • You can remove the table borders while the cursor is in the table by going to "Table Tools" -> "Design" -> "Styles" -> "Table Style 1 - Clear". Here what you will get after:

  • Now you can save and close the page. At this stage the results page will show nothing which is normal. However if you do a people search you will get following result:


Wednesday, July 4, 2012

SharePoint Calendar Overlay in Cloud - Office 365


A SharePoint team site comes with some standard lists such as Announcements, Links, Tasks, Calendar and The Discussion Board. If you have used these lists you agree with me on the fact that these are pretty basic and requires some sorts of configuration and/or customization.

When it comes to calendar, it is a great feature however nowadays everybody is complaining about the time and inability to manage their calendars and the time. If you look around there are calendars everywhere. Your peers have their own calendars, your team has a calendar, you probably have one calendar for each board room in your office, I didn't even mention your own personal calendars yet, and the list goes on and on.

If you were to manage all these calendars individually it would be a nightmare, however SharePoint 2010 supports multiple calendars and give you ability to overlay one on top of another. This way you will be able to see all similar type of calendars in one view. For example, if you are going to book a room for the next department meeting you will be able to overlay all boardroom calendars in one view and clearly see the open spots for the meeting room you want.

These calendars could be SharePoint calendars or Exchange calendars. It is actually possible to overlay an Exchange calendar on top of a SharePoint calendar. In this blog I will try to explain how to how overlay multiple SharePoint calendars into one view.

Business Requirement: SouTech Inc would like to integrate Finance, HR, Marketing, Sales, and Support  calendars into one calendar and displays on the home page. 

Functional Specification: SouTech SharePoint home page will display calendars from Finance, HR, Marketing, Sales, and Support department's calendars into a single overlay display.


Let's get started.

1. This is our corporate calendar for SouTech Inc. At this moment there is only one event listed in the main calendar.


2. On this screen select, "Calendars Overlay" under the Calendars tab and then select "New Calendar"


3. Now give a name, description, to the calendar and chose the colour. In the web URL field enter the home page link for the Finance site. For example: http://xyz.sharepoint.com/soutech/finance/, then select the list and the list view for that particular calendar and click Ok. Repeat same actions for HR, Marketing, Sales, and Support department calendars.


4. And this is how it looks like with all the SharePoint calendars displayed in one view:


Enjoy!

Friday, December 9, 2011

SharePoint Content Roll-Up on Cloud - Breaking the Silos


SharePoint is a great platform of sharing the information and collaborating in between the business units. When t is not planned carefully or some basic functions are not in place information silos can occur. After a while you end up finding your organization's information isolated to each department and not sharing necessary information between the departments.

There are many ways of breaking the silos in the enterprise using SharePoint. One of the ways of breaking the silos are using the famous "Content Query" web part.  Content Query web part placed on any page but it can render the data from different sources as such, different sites, libraries, lists, and content types. You can also filter the information in many ways.

The Content Query web part is one of the most powerful web parts comes handy with out-of-the-box SharePoint. I will  try to demonstrate how easy it is to use Content Query web part to break the silos on the Cloud (Office365).

Scenario: Soutech have Team Collaboration site for each departments. Corporate communications department publishes announcements and documents that will be consumed by other departments.

Soutech Departments:
  • Corporate Communications
  • Operations
  • Sales
  • Finance
  • Customer Support
  • IT
Before we start make sure to enable SharePoint Server Publishing on both at the Site Collection and on the sub-sites. If you are wondering how to do it, just follow the link http://office.microsoft.com/en-us/sharepoint-server-help/enable-publishing-features-HA010378243.aspx

First of all we need to create a site column for Soutech Departments. And add this column to Corporate communications Announcements. This is how it looks like after adding the site column to announcements list.


And then we need to enable "SharePoint Server Publishing " feature at the site collection level as well as at the each site level.


Now it is time to set our Content Query Web part for department sites. Let's do it for Corporate Communications first. We go to home page of Corporate Communications site and start editing the home page. Then select insert -> More web parts and then select the "Content Query" web part. Let's edit the web part.


Once we have done setting up the web part. Here is the result.  We can repeat same scenario into different departments and have them receive the announcements relative to their department.


I hope you'll enjoy the benefits of The Content Query web part while utilizing your Office365 on the Cloud.