Showing posts with label Web Part. Show all posts

Wednesday, March 19, 2014

Integrating Yammer with SharePoint Online


There is no question about the importance of social media in our daily lives. What were we doing 8 or 10 years ago without all these Facebook, Twitter, LinkedIn…. The big buzz of these days is the "Enterprise Social" for sure. Every conference I attend, everybody I talked to there is always "Enterprise Social" in the menu. In some organizations these public social networks are restricted to end-users however they still talk about the social in the enterprise. So what is this? How does is work?

If you haven't heard about Yammer, Chatter or Jive then it will be soon that you'll get introduced to either one of these network through your organization. These are the special Enterprise level social networks that brings Facebook, Twitter, LinkedIn type of functionality to your company. The major difference in between these social tools vs. the public ones is the security and control. Your IT department will have more control over how you social and what you share in the organization by utilizing these networks.

Well, to keep it short I would like to jump to Yammer directly. Yammer is acquired by Microsoft in 2012 for about $1B. It was a big news and very important acquisition for Microsoft. The goal is to integrate it with the SharePoint however it was too late in the development/release cycle of the SharePoint 2013 therefore it wasn't truly baked in.

However Yammer is very easy to integrate with SharePoint 2010 and 2013, especially with SharePoint Online which is one of the productivity tools comes under the Office 365 service offerings from Microsoft. In this blog post I would like to walk you through step-by-step instructions on how to integrate your existing Yammer ESN (Enterprise Social Network) with SharePoint Online. At this point I am assuming that you already have a Yammer network as well as already setup a SharePoint Online environment.

First you need to make sure that the account you are using for this task is the Office 365 Global Admin account. Then you need to go to your "SharePoint Admin Center" in your Office 365 administration site. And click "settings" on the left hand side quick links menu to get to a screen which you will be able to enable your Yammer service.

In this screen on the Enterprise Social Collaboration section please select "Use Yammer Service" and click "Ok"


Next you will have to get the Yammer SharePoint App from the Microsoft Office Store. In order to do this you need to go to your Office 365 SharePoint Admin page which is located at https://XXXXX-admin.sharepoint.com. Then select "Apps" from the left menu and then select "Purchase Apps". You will then land into the SharePoint App Store.

Once you are in the App Store you can locate the "Yammer App for SharePoint" either by browsing or searching. After you locate the app you will then "Add it" to your site.


After some confirmations the "Yammer App for SharePoint" will get installed in your site collection and now you can add this app to the site collection but before doing that we need to make the app available for use. Please go to the site collection which you want to add the Yammer App for SharePoint. Then click "Settings" and select "add an app" from the pull down menu. From the "Add you can add" section select "Yammer App for SharePoint". Then you will get the screen that SharePoint is asking you to trust the app for that particular site collection.
  
As soon as you hit "Trust It", SharePoint will add the app to the site collection.
No you are going to add "Yammer App for SharePoint" to the page where would you like to see the Yammer feed. Navigate to the page and then select "Page" -> "Edit". Then select "Insert" from the ribbon and click "Add an app"
 
 
 Select the "Yammer Feed" from the Parts section and then select Yammer feed app before clicking "Add". Now you've added the Yammer App for SharePoint to your page. Just click Save and exit from the editing mode. Yammer app will ask you to login to your Yammer feed by using your email and password. Just go ahead and enter your credentials. Here is how it should look like at this point.
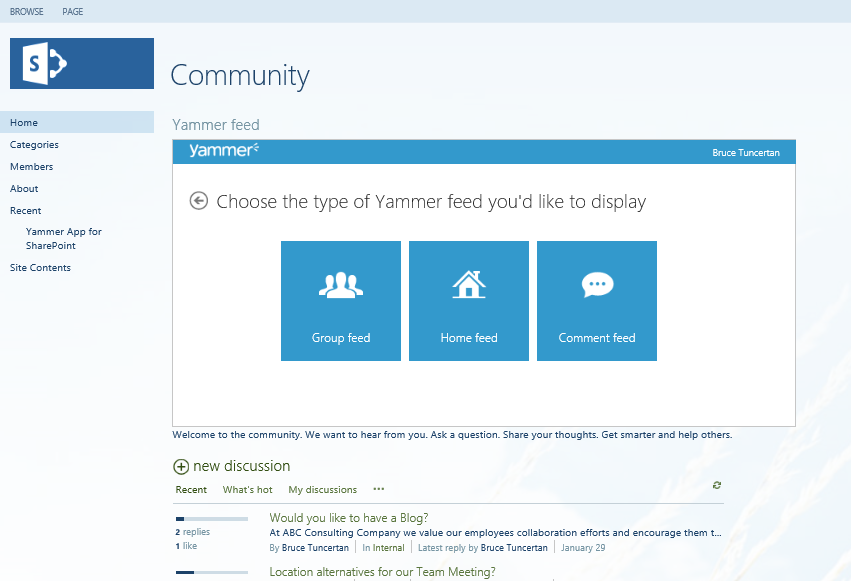

 
Yammer app will ask you to chose the type of feed you'd like to see. Lets select the "Home" feed. And here we go. We just easily integrated Yammer App for SharePoint with Office 365 - SharePoint Online.


I hope you enjoyed it. Please let me know what you think.

Tuesday, October 16, 2012

People Search in SharePoint 2010

People Search Box Web Part in SharePoint 2010


People Search is one of the great and useful features of SharePoint 2010. By using people search feature of the SharePoint 2010 users can find their co-workers not just by their names, by their hobbies, interests, department, job title, knowledge and expertise as well.

In this blogbost I would like to show you how you can enable the SharePoint People Search web part and customize it. So let's get started.

If you have a brand new SharePoint 2010 farm or you have not configure the search in your SharePoint 2010 platform, this is something you need to take care first. Here is how:
  • You need to visit the SharePoint central admin and locate your content sources under the search service application by clicking "Application Management", "Manage Service Applications", "Search Service Application" and "Content Sources".
  • If this is a new instance you'll probable have one item called "Local SharePoint sites". Please click this content source and edit.
  • In this page you need to make sure sps3://MySiteRoot item is in your start addresses list. 
  • You alse need to scheudle the full and incremental crawl in this page and check "Start full crawl of this content source" before clicking "Ok.
  • At this time you'll see the following screen:
Once this is completed, now you can insert SharePoint 2010 People Search Box web part into any page you desire. In my example I am placing the web part right into the SharePoint home page. 
  • First you will edit the page by going "Site Actions", "Edit Page"


  • Then you can select "Insert", "Web Part" by going "Editing Tools" ribbon.
  • You will chose "People Search Box" web part under the "Search" category of web parts. 


  • Once the People Search Box web part is added tot he page then we can configure the web part selecting "Edit Web Part" from the web part drop down menu.
  • While you are editing the web part, you can have scopes drop down menu and select which search scope you'd like to use and in which format. In this blog post since I will be showing the People Search, I am not including the "Scopes" drop down menu.
  • You can configure the Query Text Box, by assigning a label, fixing it's size, and defining the text box prompt string.


  • Query suggestions is a great way to display keyword suggestions to end-user while they are typing the query. These suggestion will be created automatically by SharePoint automatically based on certain number of click-throughs. There is a daily timer job scheduled to compile the suggestions. It is called "Prepare query suggestions" timer job and it is turned on by default.  If you are testing the keyword suggestions, you probably don't have any suggestion compiled yet. You can add these suggestions manually with power shell scripts. here is an example:

$searchapp = Get-SPEnterpriseSearchServiceApplication -Identity "Search Service Application"
New-SPEnterpriseSearchLanguageResourcePhrase -SearchApplication $searchapp -Language En-Us -Type QuerySuggestionAlwaysSuggest -Name "Jeff Armstrong"
New-SPEnterpriseSearchLanguageResourcePhrase -SearchApplication $searchapp -Language En-Us -Type QuerySuggestionAlwaysSuggest -Name "John Smith"
New-SPEnterpriseSearchLanguageResourcePhrase -SearchApplication $searchapp -Language En-Us -Type QuerySuggestionAlwaysSuggest -Name "Jennifer McDonald"
Start-SPTimerJob -Identity "prepare query suggestions"


  • There are many options to configure in miscellaneous section of the SharePoint People Search Box web part. Please refer to this TechNet article for further configuration options: Change properties for the Search Box Web Part (SharePoint Server 2010)
  • Once it is configured you can save the web part and save and check-in the page you are editing. This is how it will look like on the page: 


If you have done everything correctly and you have SharePoint publishing features enabled you will get a "404-Page not found" error because "peopleresults.aspx" does not exist in the Site Pages library. There are a few ways to workaround this issue. One of them is to create people results page manually. which is detailed in my other blog post called "People Search Results Return 404 - peopleresults.aspx is missing."
Here is how your results page will look like:


People Search Results Return 404 - peopleresults.aspx is missing.

People Search Results Return 404 - peopleresults.aspx is missing.


If you've turned on SharePoint publishing features and used a publishing page to house your people search web part, you got an HTTP 404 Page Not Found error.

If you can delete the "Basic Search Center" and create a new "Enterprise Search Center" you can resolve the issue. However if it is not your intention to create an Enterprise Search Center you can create th epeoplesearch.aspx page manually. Here is how:


  • Please create a new page by going "Site Actions", and "New Page"


  • You need to call this page "peopleresults"
  • This action will create a new page called "peopleresults.aspx" in the site pages liblary.
  • I suggest that you should create a basic two column 1 row table here. First column will host the search filter web part and second one will show the people search results. 
  • Please select Insert -> Table -> 2x1 Table.
  • Set the first column width to 150 pixels


  • Please locate you cursor in the first column and add "People Refinement Panel" web part by going "Editing Tools" -> "Insert" -> "Web Part" -> "People Refinement Panel".

  • Now you can locate you cursor in the second column do the same thing for "People Search Core Results" web part by going "Insert -> Web Part" under "Editing Tools"

  • You can remove the table borders while the cursor is in the table by going to "Table Tools" -> "Design" -> "Styles" -> "Table Style 1 - Clear". Here what you will get after:

  • Now you can save and close the page. At this stage the results page will show nothing which is normal. However if you do a people search you will get following result: