Showing posts with label Workflow. Show all posts

Thursday, September 22, 2011


    Office 365 and SharePoint Designer Workflow. 

    Long waited Office 365 is out since June 2011. Microsoft's cloud base office productivity suite for small and large businesses finally met with end-users. Office 365 gives you anywhere access to email, documents, contacts, and calendars. Cloud based offering consists of Exchange Online, SharePoint Online, Lync Online and Office  Applications Online.

    Very light version of SharePoint included in the previous version of the Office 365 (BPOS) has gone to a significant uplift and comes as a very decent version of the SharePoint 2010.

    Of course one of the most important features of the SharePoint is the workflows. In this post I would like to demonstrate how we can use SharePoint Designer 2010 to create a workflow on Office 365.  In this demo we will have a receipt library with a custom metadata property of department. What we want is, to send a link to appropriate department manager once a new receipt is uploaded to the library. Let's say, if receipt belongs to marketing department marketing manager will receive an email with a link to a document. If it is support then support department manager will receive the email. For all other departments operations manager will receive the email with the link.

    1. Lets create a new receipt library called receipts. Go to "Site Actions" ->  "New Document Library"

    1. Create a custom metadata column called department as "Choice" with the values of "Marketing, Sales, Operations, Finance, and Support" by going to "Library" -> "Library Settings" -> "Create Column"


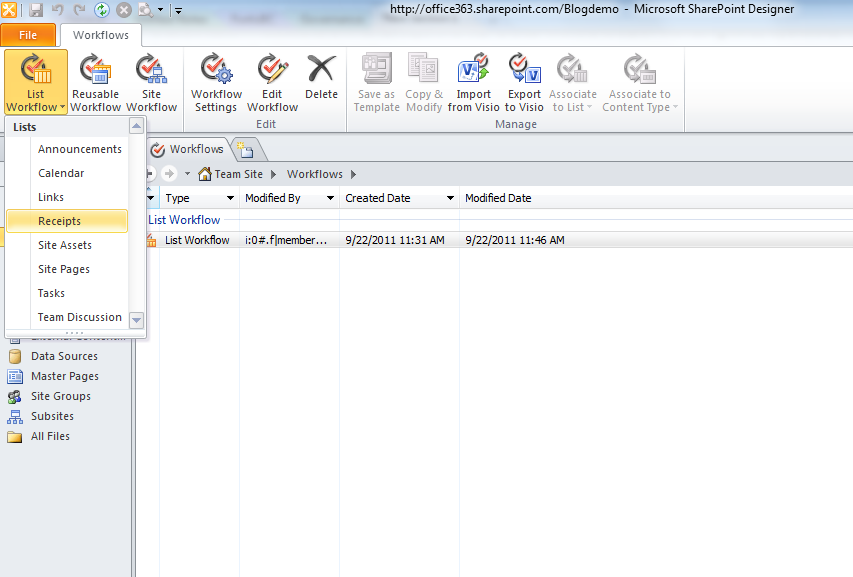
    1. Now time to go to SharePoint Designer 2010 and create the workflow. Select "Workflows" -> " List Workflow" -> "Receipts" and call it "Receipt Notification"


    1. It's time to add the conditions and actions as below.  


    1. When you are composing the email message, add recipient to "To"  field and by selecting them from the address book. Type subject and the message body as you prefer. You can add the link by clicking the link button and select "Current Item" for the text and "Encoded Absolute URL" for the address.


    1. Now we are going to make this workflow to run every time a new receipt is inserted into the receipts library. Let's click "Receipt Notification" on breadcrumb and select "Start this workflow automatically when a new item is created." under the "Start Options."


    1. Let's save and publish the workflow.


    1. Workflow is ready. Now let's run and see how it works by adding a new receipt document into the "Receipts" library at Office 365 Team Site.


    1. We will select "Marketing" department to see if Marketing Manager receives the email. As you'll see Receipt Notification workflow is worked and completed.


    1. Now lets check to see if marketing manager got the email with link. Once we go to office365.com, sign in with Marketing Manager credentials and go to "Inbox", yes there is an email with a link to the receipt as we are expecting. By clicking the link takes us directly into the document after security validation.


    I hope you'll find this useful. Please drop me an email for any feedback.


    Cheers!

    Bruce

Saturday, December 11, 2010

Nested/Inherited Content Types in SharePoint 2010


Content types are one of the main building blocks of SharePoint. Even though name says itself but content types in a nutshell are definition of a list item, a document, or a folder that give distinct characteristics to an item. By using content types you can configure metadata, workflow, information management policy, document template, and properties of any item.

For example; an expense form can easily defined as a content type, in such contains a specific form template, a workflow for approval, and a few custom site columns.

It is very straight forward to define this in SharePoint but what I would like to show you is when you need to use more than one content types that are somehow similar. The scenario would be to have a separate expense forms for marketing and support departments. Both expense forms should go through the same workflow and contain same metadata.

In this scenario it is best to use nested/inherited content type to define the common elements of the content type as base and identify differences in each child content types.

image

Major benefit of using nested content types is, if you need to modify common elements of the content type you only do this at one place and it is applied to all inherited content types.

These are what we need for this example:

Metadata columns

  • Expense Status (In-progress, Approved, Paid)
  • Expense Department (Marketing, Support)
  • Employee
  • Expense Location (Chicago, Toronto, London)

Workflow

  • Tri-state workflow

Expense template documents


Lets start adding metadata site columns first. “Site Actions” F “Site Settings” F “Site Columns” F “Create”

image


Repeat this step for department, employee, and location columns.This is how it will look at the end:image


Now we can create our base content type.“Site Actions” F “Site Settings” F “Site Content Types” F “Create”
image

image

Select “Add from existing site columns” under “Columns” section. On the following screen (“Add Columns to Content Type”) select “Custom Columns” drop down and choose all available columns and click “Add >” button. Then hit “Ok”

image


Now Content Type screen displays our new metadata columns.It is time to add the workflow. Please select “Workflow Settings” F “Add a workflow”image

Please select “Three-state” workflow. In my case because I am using SharePoint Foundation 2010 this is the only workflow available to me. Type the workflow name and select “Start this workflow when a new item is created.” F “Next”.

image

On the next screen, select “Expense Status” as choice field. You’ll notice that SharePoint automatically fill out three stages.

You can customize the workflow details on this screen, I will keep the default values and disable email features because I don’t have mail server defined in my SharePoint farm.imageimage

Click “Ok” and you will get
image

Now we have our Base content type defined. It it time to define the child content types.“Site Actions” F “Site Settings” F “Site Content Types” F “Create”
image

As you will see on the following screen all metadata inherited from “Base Expense” content type. You can also check and see the workflow is also inherited from parent content type.
image

Now we will add our expense for template to each individual child content types. Select “Advanced Settings” and locate where your expense template file is located. and hit “Ok” and repeat same steps for “Support Expense” content type.
image

After creating two content types if we look at the site content types screen this is what we will see:
image

We will now associate these two content types with our document library. Let’s go to “Shared Documents” document library. Select “Library” on the ribbon and select “Library Setting”. Select “Advanced settings” and enable “Allow management of content types?” selection. and hit “Ok”
image

Select “Add from existing content types” under “Content Types” section. Select “Custom Content Types”, choose “Marketing Expense”, and “Support Expense” and click “Add >” and hit “Ok”.
image

All necessary settings are done at this point. Now we can test and see how our content types are behaving.
Go to “Shared Documents” document library. Click “New Document down arrow” on the documents section from our ribbon bar and select “Marketing Expense”
image

Here is your “Marketing Expense” form with marketing expense properties pulled from our parent content type on the top.
image

Let’s modify the form then save and close. Now in our “Shared Documents” document library we have a new document called “Marketing Department Expense Report1” and our “Expense” workflow inherited from our parent content type is running.
image

If you need to change any metadata or make any change to workflow, all you need to do is make the necessary changes to our parent content type “Base Expense” and changes will be inherited by child content types.

Let’s test it and see if it works. I will remove “Expense Department” column from our parent content type and create a new expense document to see if it is still there.

Go to our base content type.“Site Actions” F “Site Settings” F “Site Content Types” F “Base Expense” F “Expense Department” F “Remove
image
image

We just received a message stating that “This column will be removed from all content types based on this type. …” Let’s click “Ok”

Now let’s go to our document library and create a new “Support Expense”.

Tadaa! … “Expense Department” column is removed our our child content type.
image